Portfolio
Headshots Boudoir Personal Brand
More
Guides Investment Guided Posing About Book a Session
Home  /  Guides  /  How to Pose Your Arms in Photos
Posing

How to pose your arms in photos.

Almost all of arm posing comes down to one measurement: the space between your upper arm and your ribs. Get that inch, and the bend that creates it, and every other decision about arms gets easier. This page works through where the arms go standing, sitting, in a structured sleeve and in a soft one.

By Annie Watson · Naples, Florida · Updated September 2026
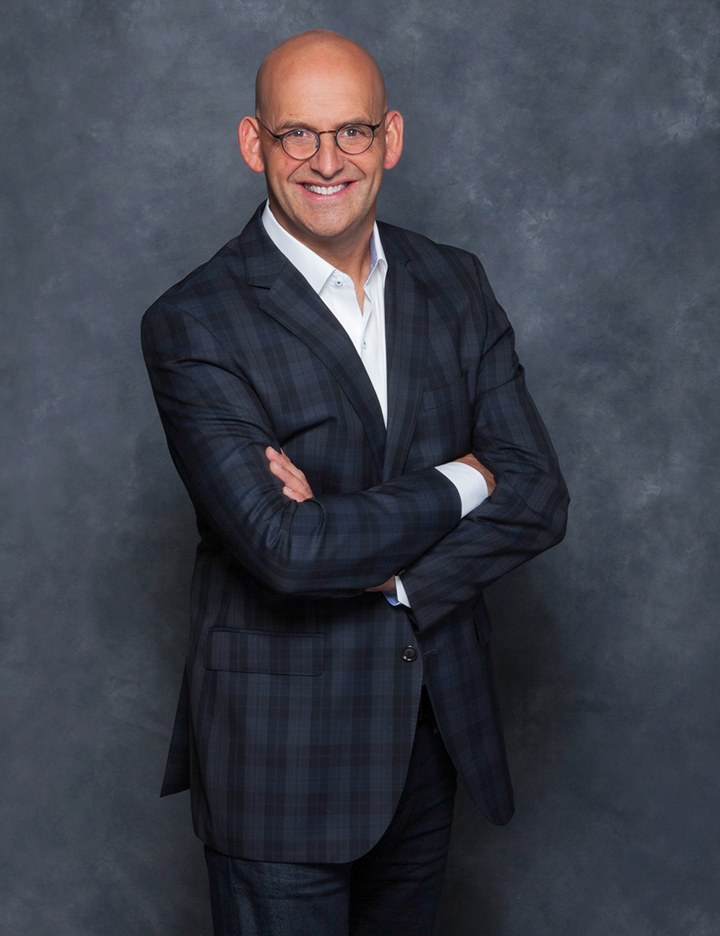
Man with a shaved head and glasses in a plaid jacket, arms crossed, dark gray backdrop, photographed by Annie Watson in her Naples studio
The Short Answer

Arm placement in photos comes down to two things: a visible gap between the upper arm and the ribs, and a soft bend somewhere in the arm rather than a straight, locked line. An arm pressed flat against the torso reads as wider than it is, because the camera cannot see any separation between arm and body, and the two blend into one wide shape.

A small gap, even an inch or two, is enough to restore that separation. It is a placement fact about how a camera reads a flat plane, and it applies the same way to every body.

The gap is the whole rule.

If you remember one thing from this page, make it this: keep space between your upper arm and your ribs. A pressed arm creates one continuous shape from shoulder to hip with no line between them, and the camera reads that shape as wider than the body actually is, whatever the body's size or shape. A bent elbow angled slightly outward puts a visible gap back in, and that gap is what lets the camera see the arm and the torso as two separate things again.

The gap does not need to be dramatic. An inch or two, enough that a rib of light shows between the arm and the side in the photograph, is enough to do the job. Overdoing it, elbow flared out wide, looks as arranged as pressing the arm flat did in the first place.

The bend at the elbow.

A straight arm, elbow locked, reads as stiff the same way a locked knee does standing. Bending the elbow even slightly, so the forearm angles rather than hangs, breaks that straight line and gives the arm somewhere to go: into a pocket, onto a hip, resting on the opposite arm, holding something.

The bend also gives the hand a destination, which solves two problems with one adjustment. An arm with nowhere specific to go tends to hang, and a hanging hand at the end of a straight arm is exactly the setup that makes people feel like they do not know what to do with their hands. Bend the elbow first, and the hand usually finds somewhere sensible to land on its own.

Standing arms: four reliable placements.

  • One hand in a pocket, thumb outside, elbow bent enough to create a gap at the ribs.
  • One hand resting on the opposite forearm, which also gives the far arm a soft, natural bend.
  • A hand holding the edge of a jacket or the strap of a bag, which gives the whole arm a job with almost no thought required.
  • Arms loosely folded, provided there is still a gap where the forearms meet the torso rather than a flat press.

Test any of them side-on to a mirror. Hold the arm flat against your side first, then move only the elbow out an inch and watch the outline of the torso change while the rest of you stays still. That inch is the whole adjustment.

Seated arms: the same gap, a different setup.

Seated, the temptation is to let the arms fall straight down against the sides or press flat into the lap, both of which recreate the pressed-arm problem in a seated shape. Rest one hand on the opposite forearm, or let one hand rest along the leg with a soft bend at the elbow rather than a straight drop from the shoulder.

Where a standing arm can drop into a pocket, a seated one usually has to be given its task on purpose, because gravity and a lap will otherwise decide it for you. The same daylight rule applies here as standing: check that the upper arm has visible space beside it rather than lying flat against the torso.

The full mechanics of a seated pose beyond the arms, the lean, the legs and the seat position, are covered on my seated posing page.

Sleeves and structure change the rules slightly.

A structured jacket sleeve holds its own shape and hides a small bend at the elbow more easily than a soft knit does, which is why a blazer photographs forgivingly even with a fairly plain arm position. A soft, unstructured sleeve shows every wrinkle and crease that a bend creates, so the elbow angle matters more, not less, in something like a t-shirt or a light blouse.

Rolled or pushed-up sleeves change the arm's visible shape further, since the forearm becomes part of what the camera reads rather than fabric. In that case the same rules apply to the bare forearm that apply to the whole arm: a soft bend rather than a straight line, and a hand with a job rather than one left to hang.

Crossed arms, and where the gap goes.

Crossed arms are the one placement where the gap rule is easiest to lose, because the whole point of the pose is to bring the arms in.

The gap rule still applies inside the cross. Keep a little space at the elbows rather than folding the arms into one compressed block against the chest, so the forearms read as two separate lines across the body instead of a solid band. That is the arm half of the pose, and it is the half this page can answer.

Everything else a cross depends on, the grip, the shoulders, the stance underneath it and whether the hands show or tuck, is a page of its own: crossed arms in headshots.

What arm placement is not doing.

Arm placement is not a fix for a body, and I would rather say so plainly than let the gap rule sound like a promise. It changes one thing: whether the camera can see daylight between your arm and your side, and daylight is what separates two shapes instead of blending them into one. Nothing about your size changes. What the frame shows changes.

It is also not something you have to solve perfectly on your own before a session. In the studio I am watching for pressed arms and locked elbows constantly, the same way I watch posture and hands, and I correct it in the moment rather than expecting anyone to arrive with it already handled.

Arms, hands and where this fits.

Arms and hands are connected but not the same problem. Getting the arm's angle and gap right sets the hand up to land somewhere sensible, but the hand itself, what it holds, how the fingers sit, still needs its own attention. My page on what to do with your hands picks up exactly where this page leaves off.

The gap and the bend work the same way on every frame. What shifts with a fuller figure is which placements are easiest to hold and how the crop is chosen, and that has its own page, posing for plus-size portraits, rather than a line folded into general advice.

For how arm placement fits into looking unposed overall, read how to look natural in photos. The mechanics this page builds on, feet to chin, are in how to pose for photos, and everything above applies without much adjustment whether the sitting is for headshots or a personal brand library.

Key Takeaways
  • Keep a visible gap between the upper arm and the ribs. A pressed arm reads as one wide shape instead of two separate ones.
  • Bend the elbow rather than locking the arm straight. The bend gives the hand a destination and breaks up a stiff, straight line.
  • The overcorrection is an elbow flared wide, which looks as arranged as a pressed arm. An inch or two of gap is the target.
  • Seated arms need the same gap as standing ones, usually solved by resting a hand on the opposite forearm or on the leg with a soft bend.
  • Soft, unstructured sleeves show the elbow angle more clearly than a structured jacket does, so the bend matters even more in a t-shirt or blouse.
  • Crossed arms are still governed by the gap: keep space at the elbows so the fold reads as two forearms rather than one solid band.
  • Arm placement changes how a camera reads separation between two flat planes. It is not a promise about how a body looks, only about what the camera can see.
Next Step

Daylight at the elbow, every frame.

A pressed arm or a locked elbow is one of the smallest corrections in a sitting and one of the most common, and it is caught in the frame, not in the mirror. Pricing and planning are personal, so call (239) 319-6171 or send the form, and the elbows stop being something you have to think about.

Book a Session Call (239) 319-6171
Put It to Work

Sessions this guide points to.

Good to Know

Questions, answered.

Why do photographers always say to leave a gap at the elbow?
Because a camera reads a flat arm pressed against a flat torso as one continuous, wider shape, with no line to show where the arm ends and the body begins. A small gap, an inch or two, restores that separation, so the camera can read the arm and the torso as two distinct shapes instead of one. It is a fact about how a flat plane photographs, not a comment on anyone's body.
What if I genuinely do not know what to do with my arms?
Start with one placement rather than trying to solve everything: a hand in a pocket with the thumb out, or a hand resting on the opposite forearm. Both create an elbow bend and a gap automatically, without requiring you to think about either separately. In the studio I place your arms directly, so on your own you only need one or two placements you feel comfortable returning to.
My arms end up doing the same thing in every photo. How do I change that?
Change one variable rather than inventing a new position. Move the same bent elbow from a pocket to the opposite forearm, then to a loose fold, and the arm reads differently in each frame while the gap and the bend stay exactly where they were. Across a sitting with several looks, that is usually enough variety without learning a single new pose.
What if holding my arms away from my body feels unnatural?
It will, the first few times, because an inch of space at the elbow feels like a foot from the inside. That mismatch is normal and it is why the mirror test matters: what feels exaggerated in the arm looks like nothing at all in the photograph. Bend the elbow to give the hand somewhere to go and the gap appears without you holding it open on purpose.
Does the type of clothing change how I should pose my arms?
Yes. A structured jacket sleeve holds its shape and forgives a fairly plain arm position, while a soft or unstructured sleeve shows every crease a bend creates, so the elbow angle matters more in something like a t-shirt or a light blouse. Rolled or pushed-up sleeves expose the bare forearm, which then follows the same soft-bend rule as the whole arm.
Does arm placement work the same way for every body type?
The mechanics, the gap and the bend, apply the same way regardless of body type, because they are about how a camera reads separation between two shapes, not about a specific size or frame. Certain considerations do shift with body type, which is why plus-size posing has its own page rather than one set of instructions treated as universal.
Book Your Session

Your best headshot is one session away.

Tell me a little about what you have in mind and I will be in touch personally. Pricing is personal, so the best way to plan is a quick call.

Studio
5400 Yahl St, Naples FL

Prefer to talk? Call (239) 319-6171. I respond personally.