Portfolio
Headshots Boudoir Personal Brand
More
Guides Investment Guided Posing About Book a Session
Home  /  Guides  /  Posing for Plus-Size Portraits
Posing

What the camera reads, and how to direct it.

Most posing advice written for fuller figures is really a list of things to hide, which is both unpleasant to read and not how photographs work. A camera does not see a body. It sees a flattened arrangement of angles, distances and overlaps, and every one of those is a decision somebody behind the lens gets to make on your behalf.

By Annie Watson · Naples, Florida · Updated September 2026
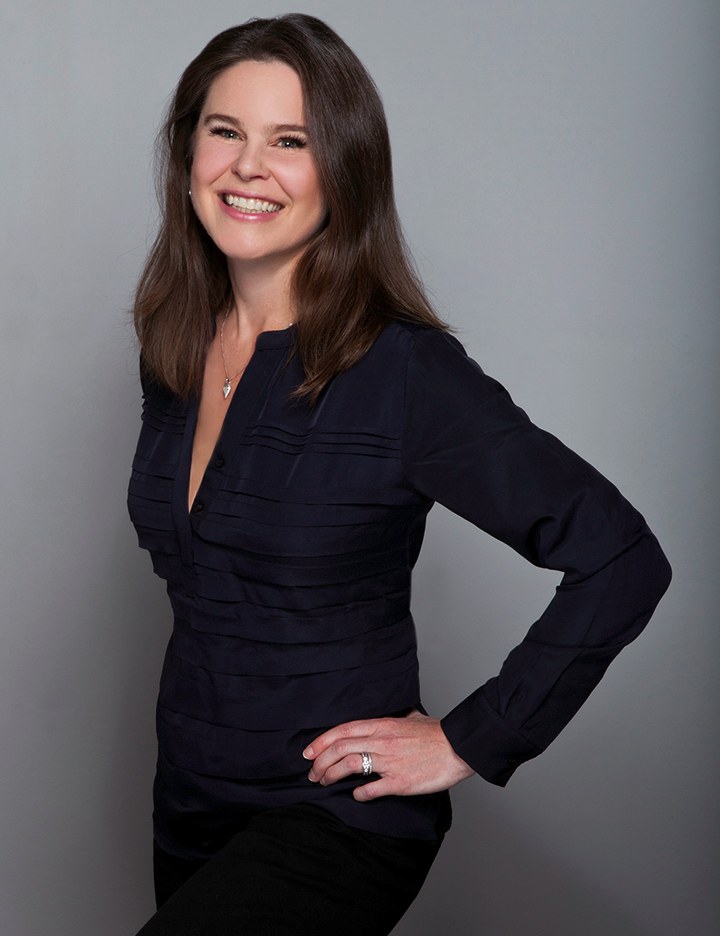
Woman with long brown hair in a navy top, hand on hip, dark backdrop, photographed by Annie Watson in her Naples studio
The Short Answer

To pose for a plus-size portrait, work with separation and angle rather than concealment. Turn your body away from the lens and bring your face back. Keep a visible gap between your arms and your torso. Hinge forward slightly from the hips. Push your forehead toward the camera and lower your chin a fraction so the jaw separates from the neck.

None of that changes your body. It changes what a two-dimensional frame does with it: where the edges fall, what overlaps what, and what sits nearest the lens. That is the honest description of posing at any size, and it is the photographer's work rather than yours.

A lens flattens, and that is the job.

Everything on this page follows from one piece of physics. A camera takes a three-dimensional person and flattens them into two dimensions, and in that flattening a few things happen predictably. Anything nearer the lens is rendered larger. Anything that touches something else merges with it, because depth is gone and only outlines remain. And an edge with light behind it separates, while an edge with nothing behind it dissolves into whatever it is against.

Each of those three effects is a variable somebody can set. Where you stand relative to the lens, which parts of you touch, what has light behind it and what does not: change any of them and the outline in the frame changes while the person standing there does not.

It is also why the useful vocabulary here is reads rather than looks. A pose does not make anybody smaller and I will not pretend otherwise. It decides what the frame emphasizes, which is a real and substantial thing, and it is the same principle that governs how to pose for photos at any size at all.

Separation is the whole idea.

If you remember one word from this page, make it that one. Almost every adjustment worth making is a version of putting daylight between two things that were touching.

  • Arm and ribs. An arm pressed flat against the side merges with the torso and both read wider than they are. A visible gap, even a small one, separates them into two shapes.
  • Jaw and neck. Forehead forward, chin down a fraction, and the line under the jaw becomes an edge instead of a merge.
  • Hand and body. A hand resting flat against a hip or thigh disappears into it. Turn the narrow edge of the hand outward and leave a little air behind the wrist.
  • Chin and chest. Length through the spine and the crown of the head keeps the head from settling down into the shoulders.
  • You and the background. Tonal contrast between what you wear and what is behind you is what stops your outline dissolving, which is a lighting and backdrop decision as much as a posing one.

The arm gap is the one worth trying in a mirror, because it feels most exaggerated and shows up most on camera. Bring the elbow forward a couple of inches and rest the hand somewhere. From the inside it feels deliberate and strange. In the frame it reads as an ordinary relaxed arm.

Angle, distance, and what sits closest.

The second principle is that the camera exaggerates whatever is nearest to it, which turns out to be a tool rather than a hazard once somebody is using it deliberately.

Start with the turn. Standing square delivers the widest possible outline to the lens and gives the picture no diagonal at all. The general version of that turn, with the angles and the footwork, is set out in how to pose for photos; what matters here is what the turn is doing. The near hip drops back, the body reads as a line rather than a wall, and the clothes hang the way they were cut to hang.

Then decide what is closest. Whatever you push toward the lens grows, so keep hands low and away from the front plane of the picture, and let your face be the nearest thing to the camera rather than a shoulder, a knee or a palm.

Camera height finishes it. At or a touch above your eye line is the working range for nearly everybody. Lower than that, the lens looks up at your jaw and shortens the whole line, which no amount of good posing recovers.

The lean does more than anything else.

If separation is the principle, the forward hinge is the single highest-value move built on it, and it is the one people are most likely to skip because it feels peculiar.

Standing, it is small: hinge from the hips so your upper body travels toward the camera by an inch or two, keeping the spine long rather than curving the shoulders forward. Your face comes closer to the lens, so it takes a little more of the frame, while your hips move slightly further away. The torso lengthens instead of stacking. And a forward lean reads to a viewer as engagement, which is a bonus that has nothing to do with geometry.

Seated, the same hinge stops being optional. Sinking backward rounds the spine, rolls the shoulders in and lets the head settle toward the collarbone, and each of those closes a gap you had just opened. Keep the weight forward of your hips, both feet planted, knees angled away from the camera, and hinge from the hips so the spine stays long.

One caution, because leaning has a wrong version. Hinge from the hips, not the neck. Pushing the head forward while the body stays back reads as peering, and it undoes the neck geometry you were building.
Arms, hands, and the space you keep.

Left alone, arms default to the worst available position: hanging straight down, pressed against the sides, hands dangling. It is the honest resting position of a body that has not been told anything, and it is also the one that merges the arms into the torso completely.

The fix is a destination rather than a pose. Somewhere for the hand to go creates the elbow angle, and the elbow angle creates the gap.

  • A thumb hooked into a pocket, with the rest of the hand outside rather than buried.
  • One hand holding the opposite forearm, low and loose, which builds a gap on both sides at once.
  • A hand on the edge of a jacket or a lapel, which opens the front of the garment and keeps the shoulder line honest.
  • Something real to hold, held the way you would actually hold it, kept below the collarbone.
  • Fingers softly curved, and the hand shown side-on rather than square to the lens, because a flat palm reads far bigger than it is.

Two positions deserve a warning. Hands planted on the hips lift both shoulders toward the ears and shorten the neck, so if you use it, the shoulders have to be pushed back down afterward. And folded arms build a horizontal band across the front of the picture at the widest point of the torso, which is exactly where a frame least needs one. Neither is forbidden. Both need managing rather than assuming, and a great deal of what gets repeated about them belongs in posing myths rather than in a working session.

What clothing adds to a pose.

Wardrobe and posing are not separate problems. What you wear decides which poses are even available, and no amount of direction rescues a garment that is fighting you.

Structure is the useful word. A piece with some architecture in it, a jacket, a firm knit, anything with a defined shoulder seam, holds a line when you turn and keeps an edge where an edge helps. Something very soft drapes to whatever is underneath it and gives the pose nothing to work with, which means the shape has to come entirely from your body.

Fit matters more than size on a label, and the two most common problems pull in opposite directions. Clothing that is too tight creates horizontal lines exactly where the fabric is under strain, and a camera finds every one of them. Clothing chosen a size large to feel safer adds bulk the frame reads as body rather than as fabric. The whole question, including what a small alteration is worth, is handled in fit and tailoring on camera.

This is why looks are planned in advance rather than sorted out on the day. Knowing what is coming means the poses, the angles and the light get chosen for the clothes, instead of the clothes quietly limiting all three.

Nothing needs fixing beforehand.

Two claims surround this subject, and both are wrong in ways that cost people actual photographs.

The first is the promise. Posing gets described as though it removes something, and it does not. Angle, distance, separation and light change what a flat image emphasizes, which is genuinely powerful, but the person in the picture is the person who walked in. I would rather tell you what the mechanics do than sell a result nobody can deliver.

The second is the delay: the sitting that waits for a program, a threshold, a better year. That argument is made in full, for a more personal kind of sitting, on boudoir for every body, and it applies here without a word changed. Nobody is asked to change anything first. The technique adapts to the person rather than the other way round.

If what you actually need is a working portrait, everything here applies directly to headshots, and the frame-by-frame version aimed at women is in how to pose for women's headshots. In every one of them the direction is continuous, so none of this is a list you have to hold in your head while somebody photographs you.

Key Takeaways
  • A camera flattens depth, so posing is about distance, overlap and edges rather than about the body itself.
  • Separation is the governing idea: daylight between arm and ribs, hand and body, jaw and neck, and you and the background.
  • Turn away from the lens with the weight back, and let your face be the nearest thing to the camera.
  • Hinge forward from the hips, standing and especially seated, because sinking backward closes every gap you opened.
  • Give the hands a destination, and the elbow angle, with the gap it creates, happens on its own.
  • Structured clothing that fits gives a pose something to work with; too tight and too large both cost you the same way.
  • No pose changes a body, and nobody is expected to change anything before being photographed properly.
Next Step

Come as you are, and be directed.

Every adjustment on this page is one I would make out loud, for you, in the moment, because separation and angle are impossible to judge from inside your own body. Nothing is asked of you beforehand except turning up. Pricing is personal, so start with a call to (239) 319-6171.

Book a Session Call (239) 319-6171
Put It to Work

Sessions this guide points to.

Good to Know

Questions, answered.

Does posing actually make a difference, or is that just something photographers say?
It makes a substantial difference, and it is worth understanding why so the claim stays honest. A photograph has only a few variables to work with: the angle to the lens, what sits nearest it, what overlaps what, and where the light falls. All four are real, all four are decisions rather than accidents, and none of them touch the person. They decide what a flat picture emphasizes, which is a smaller claim than the one usually made and a far more reliable one.
What is the single most useful thing I can practise at home?
The arm gap. Stand in front of a mirror with your arms hanging straight down, then bring one elbow forward and rest that hand somewhere, so a strip of space opens between your arm and your side. Look at how differently the two versions read. It feels theatrical from the inside and reads as an entirely ordinary relaxed arm in a photograph, and that gap between feeling and result is most of what posing is.
Are full-length photographs a bad idea?
Not at all, and avoiding them tends to produce a set of pictures that all look the same. Full length simply asks for more of the mechanics at once, because the feet, the weight and the whole line of the body are in the frame. Stagger the feet, weight back, knees soft, hands with somewhere to be, and hinge slightly forward. It is a pose that needs directing rather than a pose to skip.
Is being photographed from high above a good idea?
It is a trick rather than a technique, and it announces itself. A steep angle from well above foreshortens the whole body, makes the head disproportionate and reads exactly as what it is, which is a picture taken from somewhere chosen to disguise something. The useful range is narrow: level with your eyes, or a touch above. Inside that range the choice is a craft decision. Outside it, the angle becomes the subject.
How much will be edited afterward?
Images are retouched by hand, and the goal is a photograph that still looks like you. The heavy lifting happens before any of that, in the angle, the separation and the light, which is why the posing is worth this much attention in the first place. If something specific concerns you, say it out loud before we start rather than hoping an edit will quietly cover it.
Book Your Session

Your best headshot is one session away.

Tell me a little about what you have in mind and I will be in touch personally. Pricing is personal, so the best way to plan is a quick call.

Studio
5400 Yahl St, Naples FL

Prefer to talk? Call (239) 319-6171. I respond personally.